Amsterdam Kitchens: 7 Common Mistakes (and How We Fix Them)
Amsterdam kitchens ask a lot from a small footprint: social cooking, serious storage, quiet appliances, and durable materials—often packed into narrow floorplates with tricky logistics and layers of regulations. Here are the mistakes we see most often in Amsterdam and Noord-Holland homes, and the fixes we reach for when designing and renovating kitchens every week.
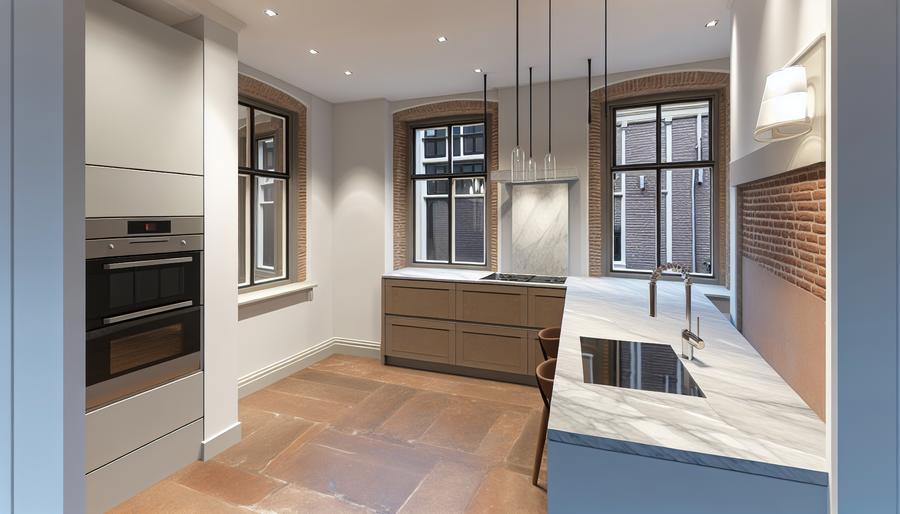
Mistake 1: Oversizing the island in a narrow floorplan
Big islands look great online, but in many canal houses and 1930s apartments the math doesn’t work. An island that chokes circulation makes the whole home feel smaller, and it’s a nightmare on move-in day when you realise it can’t pass the stairs or turn a corner.
Solution: Treat 900–1000 mm as a healthy corridor width between work zones. In long, narrow rooms, consider a double-run galley or a slim peninsula (600–700 mm depth) rather than a full island. Use a shallow tall unit (300–400 mm) for dry goods to gain storage without eating walkway. If you must have seating, cantilever 250–300 mm for stools and keep corners rounded to avoid bruised hips in tight spaces.
Mistake 2: Forgetting Amsterdam logistics—narrow stairs, hoisting, permits
Many Amsterdam homes were never designed for modern appliances. Narrow staircases, steep treads, and tight landings defeat standard fridge-freezers and one-piece worktops. Even if your home has a hoisting beam, using it isn’t always straightforward.
Solution: Plan delivery first. Check stair widths and turning radii, window clear openings, and façade restraints. For canal-side addresses, confirm whether street permits or temporary parking exemptions from the Gemeente are required for hoisting. Break long worktops into clean, book-matched sections with near-invisible joints; choose split refrigeration (integrated column fridge and separate undercounter freezer) to fit stair widths. Modular carcasses, knock-down larders, and two-piece islands mean you can get high-end results without a crane.
Mistake 3: Poor ventilation and noise control in old masonry
Recirculating hoods struggle with heavy Dutch winter cooking, and duct runs in old masonry can be tricky. In terraced canal houses with timber joists, vibration and hood noise travel easily to neighbours, and Amsterdam’s quiet hours and many VvE house rules limit what you can get away with.
Solution: Prioritise a short, straight ducted route to outside wherever Monumentenzorg or the VvE allows. Use an external or inline fan to keep the motor away from the hob and reduce noise in the kitchen. Where façade penetrations are restricted, pair top-tier recirculating systems (plasma or long-life carbon) with proper make-up air and airtight hob-to-hood zoning. Add anti-vibration mounts on ductwork crossing timber joists and specify acoustic backing on cabinet panels. Schedule noisy work within allowed hours and document it for the VvE to keep relations smooth.
Mistake 4: Ignoring Monumentenzorg and VvE constraints
In listed canal houses or protected streetscapes, you often can’t punch a new hole in the façade or move wet services freely. In apartments, changes to shafts, floor build-ups, or balcony-facing units usually need VvE approval. Skipping these conversations costs time and goodwill.
Solution: Map constraints before design. For monuments, plan around existing risers and use reversible construction: freestanding plinths for services, magnetic fixings for panels, and concealed routes in existing chases. For VvE properties, submit tidy technical drawings showing fire stops, acoustic layers, and no increase in communal load. If you’re relocating the kitchen, confirm drain falls and backflow risk—older stacks can’t handle long horizontal runs without a pump and venting strategy.
Mistake 5: Underestimating structure and services—especially for induction
Heavy stone islands on 18th–19th century timber floors can overload the balkenlaag (joist layer). Upgrading to induction and multiple ovens can outstrip an old groupenkast, and three-phase power upgrades via Liander have lead times.
Solution: Get a quick structural check for concentrated loads over old joists, especially near party walls. Distribute mass: use porcelain or composite at thinner sections, hollow plinths, and lightweight carcasses. For power, plan NEN 1010-compliant circuits early—separate groups for induction, ovens, and dishwasher—and apply for 3x25A if needed. Coordinate with meter-cupboard space in tight hallways. If you’re chasing a better energy label, consider bundling kitchen works with ISDE-eligible upgrades (e.g., a heat pump boiler for domestic hot water) while you’re already opening walls.
Mistake 6: Skimping on real storage in small footprints
Open shelves look airy but turn dusty, and corner voids swallow pots. Without a proper pantry strategy, worktops become the overflow for everything.
Solution: Go vertical with a tall larder featuring internal drawers; they keep spices and tins visible and ergonomic. Borrow from bespoke pantry concepts: pocket doors that reveal a countertop station for coffee or baking, integrated lighting, and power inside. Use 45 cm-wide appliances (dishwasher, combi-oven) where it frees a full-height pull-out. Fit a slim rail system for everyday tools and build a recycling drawer sized for Amsterdam’s waste separation. In corners, choose Le Mans trays or diagonal cabinets over dead space.
Mistake 7: Choosing materials that won’t survive Dutch light, moisture, and use
Amsterdam’s soft, overcast light is unforgiving on fingerprints and uneven finishes. Ground floors can be damp, and bike scuffs happen. Some stones etch with citrus; some woods yellow under skylights.
Solution: For fronts, consider Fenix or high-pressure laminate with a soft-matte, anti-fingerprint finish. For timber, quarter-sawn oak with hardwax oil resists cupping and wears in gracefully; specify water-resistant plinths and sealed edges. For worktops, sintered stone or honed composite handle daily use; if you love marble, use it on a small prep block, not the main run. Limewashed mineral paints on walls diffuse light beautifully but seal splash zones. Zellige or handmade tiles? Seal and grout with stain-resistant products. Hardware in brushed stainless or blackened steel stands up to humidity and cleans easily.
Amsterdam-specific planning checklist
- Measure reality: stair widths, window clear openings, and turn radii for every large item.
- Secure approvals: confirm Monumentenzorg limits and VvE requirements before final design.
- Ventilation route: decide ducted vs recirculating early; plan noise control and make-up air.
- Power and water: check groupenkast capacity, plan circuits, and confirm drain fall feasibility.
- Structure: verify joist directions and load paths before committing to heavy islands.
- Logistics: book hoisting/permits if needed and choose modular components to fit access.
- Materials mock-up: test finishes in natural overcast light to check colour, sheen, and smudge resistance.
Designing an Amsterdam kitchen is part puzzle, part choreography. When you respect the building’s bones, work with the city’s logistics, and choose resilient, tactile materials, small kitchens become serious, quiet performers. If you want a sanity check on structure, services, or permits, bring in a contractor used to Amsterdam’s realities early—before the dream island meets a very real staircase.