Bathroom Planning in Amsterdam: A Technical Guide to Smart Wet Rooms
Designing a bathroom in Amsterdam or Noord-Holland means balancing charm (beam floors, narrow staircases) with rigorous waterproofing, acoustics, and ventilation. If you’re considering a wet room—an open, fully waterproofed shower area—smart planning up front will save headaches later. Here’s the technical guide we use with clients, translated into plain language.
Start with the bones: structure, services, and approvals
Most Amsterdam homes, especially canal houses and pre-war apartments, sit on timber joists over pile foundations. Before any layout decisions, confirm joist direction, spacing, and condition. A wet room adds concentrated load (screed, tiles, glass, water). In older timber floors, we often switch to lightweight build-ups (cement backer boards or foam-core panels) and avoid heavy screeds unless a structural engineer signs off.
In apartments with a VvE (owners’ association), changes that affect communal elements—soil stacks, ventilation routes, floor heights—need approval. Sound transmission is a common sticking point. We typically add an acoustic underlay and decouple backer boards from joists with rubber isolators to reduce impact noise. Expect quiet-hours rules during construction and plan deliveries through narrow staircases; large shower screens may need a hoist permit via the municipality.
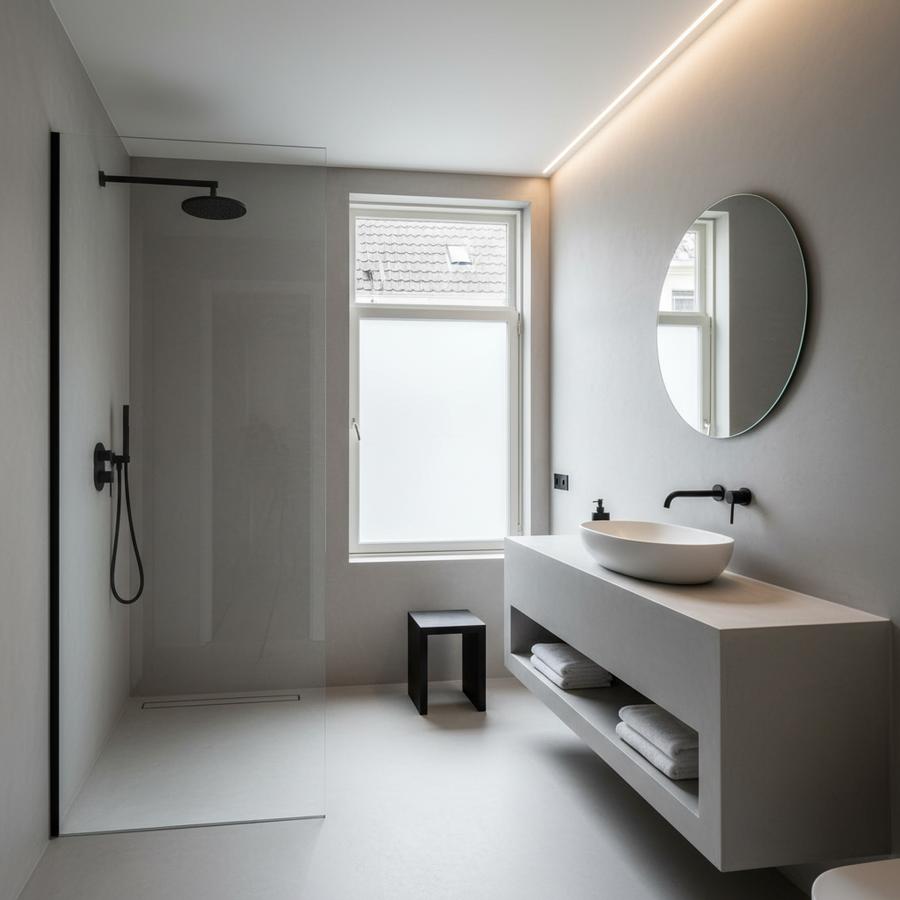
Layout logic: drains, clearances, and storage
Let the drainage and existing soil stack guide the layout. A straight, short run to the stack helps avoid raising the floor for pipe fall. For wet rooms, a linear drain along the wall keeps slopes simple, and a flush threshold is achievable if the floor can be recessed between joists (again: structure check). Target a fall of 1.5–2% toward the drain; too flat and you’ll get puddles, too steep and it’s uncomfortable.
Plan clearances early: 900 x 900 mm is a comfortable shower footprint; 600 mm front clearance at the basin prevents shoulder bumps; 700–760 mm in front of the WC makes it usable. Build niches into stud walls for storage, and keep sightlines open—especially in narrow canal-house bathrooms—by using a single fixed glass panel instead of a full enclosure.
Wet room build-up: waterproofing that actually works
Success here is about layers and junctions. Over timber floors, we use a decoupling mat with a tanking membrane up the walls at least 100–150 mm, continuous into corners with preformed tapes. In the shower zone, extend the membrane at least the entire splash area; for peace of mind, we often tank the entire room up to 1200 mm. A preformed sloped tray can deliver precise falls with just 20–40 mm build-up; custom screeds need more depth and add weight.
Choose a quality linear drain (douchegoot) with removable hair trap and integrated flange for the membrane. Stainless steel bodies with height-adjustable grates make tile alignment easier. Movement joints: add silicone or profiles every 3–4 meters and at changes of plane; grout alone will crack. If you love seamless finishes, consider lime-plaster (tadelakt or modern microcement) from a certified applicator; specify compatible waterproofing and verify slip resistance.
Ventilation, heating, and moisture control
Amsterdam’s climate is damp and cool; a beautiful wet room needs dry air. Aim for an extract fan delivering 75–100 m³/h with a humidity sensor and run-on timer. In apartments, connect to existing mechanical ventilation rather than punching new façade holes—façade changes can trigger permit and Monumentenzorg review in protected streetscapes. Where possible, route through the roof with a discrete vent tile or existing chimney flue liner.
For comfort, low-profile electric underfloor heating in the shower zone speeds drying, but confirm electrical zones: Dutch NEN 1010 requires equipment in Zone 1 to meet the correct IP rating and RCD protection. Towel radiators help if the rest of the home uses low-temperature heating (heat pump). If you’re upgrading hot water, a heat pump or solar boiler can qualify for ISDE subsidy; plan fixture flow rates (7–9 l/min showers feel good with air-mix heads) to match your hot water capacity.
Amsterdam-specific logistics: monuments, stairs, and noise
In listed buildings or within protected cityscapes, Monumentenzorg may limit visible changes: no external grilles on a historic façade, and window alterations are sensitive. We often hide ventilation in joinery or repurpose an unused flue. Original beam floors can be uneven; we level with light boards rather than thick screeds to respect structural limits and avoid loading the pile foundations.
Access is a real constraint. Many grachtenpanden and upper-floor apartments have tight, winding stairs. Measure the narrowest turn and door width before ordering glass or large tiles. Oversized porcelain slabs might be impossible to carry; consider 60 x 120 cm modules instead. If hoisting via the front window is required, coordinate a short-stay parking and lifting permit and notify neighbors about noise windows set by the district (stadsdeel).
Plumbing details that keep the peace
To avoid shower temperature swings, use thermostatic valves with pressure balancing. Acoustic lagging on supply and waste pipes prevents the classic “gurgle” heard by downstairs neighbors. Maintain adequate trap seal depth (50 mm typical) and include an accessible clean-out near the linear drain. If relocating the WC, respect the fall (at least 1–2 cm per meter for 110 mm pipe) and the VvE’s rules on stack connections. A shower heat-recovery drain (douche-WTW) can cut energy use notably; it’s slim enough for many timber floors and pairs well with low-flow heads.
Simple planning checklist (use this before you order anything)
- Survey & approvals: Map joists, stack, ventilation route; check Monumentenzorg/VvE implications and permits via the Omgevingsloket.
- Drain strategy: Choose linear drain location; confirm achievable fall and build-up height for a flush threshold.
- Waterproofing spec: Full-room or shower-only tanking; pick membrane system, corner tapes, and movement joints.
- Ventilation plan: Select humidity-sensing fan, route exhaust discreetly, ensure make-up air via door undercut (10–15 mm).
- Hot water & fixtures: Match flow rates to boiler/heat pump capacity; consider douche-WTW and thermostatic valves.
- Acoustics: Add underlays, pipe lagging, and decoupled boards to satisfy neighbors and VvE.
- Access & scheduling: Verify dimensions for delivery; plan hoist if needed; align works with building quiet hours.
Materials that suit Dutch bathrooms
For floors, porcelain with R10–R11 slip rating is pragmatic. On walls, ceramic or lime-plaster finishes with verified waterproof systems perform well. Oak or bamboo veneers (sealed) bring warmth; use marine-grade plywood cores. Hardware in brushed stainless or PVD-coated brass resists coastal humidity. Keep maintenance in mind: light grout, removable drain covers, and accessible service hatches behind mirrors make life easier.
A well-planned Amsterdam wet room is about precision more than opulence. Get the falls right, protect the structure, ventilate quietly, and respect the local rules. The result is a calm, durable space that belongs to the building—and works for the way you live.