Small Amsterdam Kitchens: 10 Layout Mistakes to Avoid (and Smart Fixes)
A compact Amsterdam kitchen can perform like a chef’s workspace when the layout is deliberate. In tight apartments—from Jordaan canal houses to 1950s walk-ups—the difference between frustration and flow is often 50–100 millimetres, a door swing, or an appliance choice. Below are the top layout mistakes we see, and how to avoid them with elegant, durable solutions that respect local building constraints.
Start with the room you have, not the kitchen you want
Measure the structural grid and services before sketching cabinetry. In older grachtenpanden, floors are timber joists on pile foundations; a stone island plus slab splashbacks can overload a weak span. Keep heavy masses near load-bearing walls and confirm joist direction. Where in doubt, a quick check by a structural engineer is cheaper than rework later.
Map the existing risers for water, waste, and ventilation. In Amsterdam blocks, sinks and dishwashers usually need to remain on the wet wall. Waste pipes require fall; a sink moved too far across the room may force a raised plinth or a pump (noisy and high-maintenance). If you’re switching from gas to induction, verify your meterkast capacity and whether a 2‑ or 3‑phase upgrade is required; it impacts the layout of the electrical chase and consumer unit.
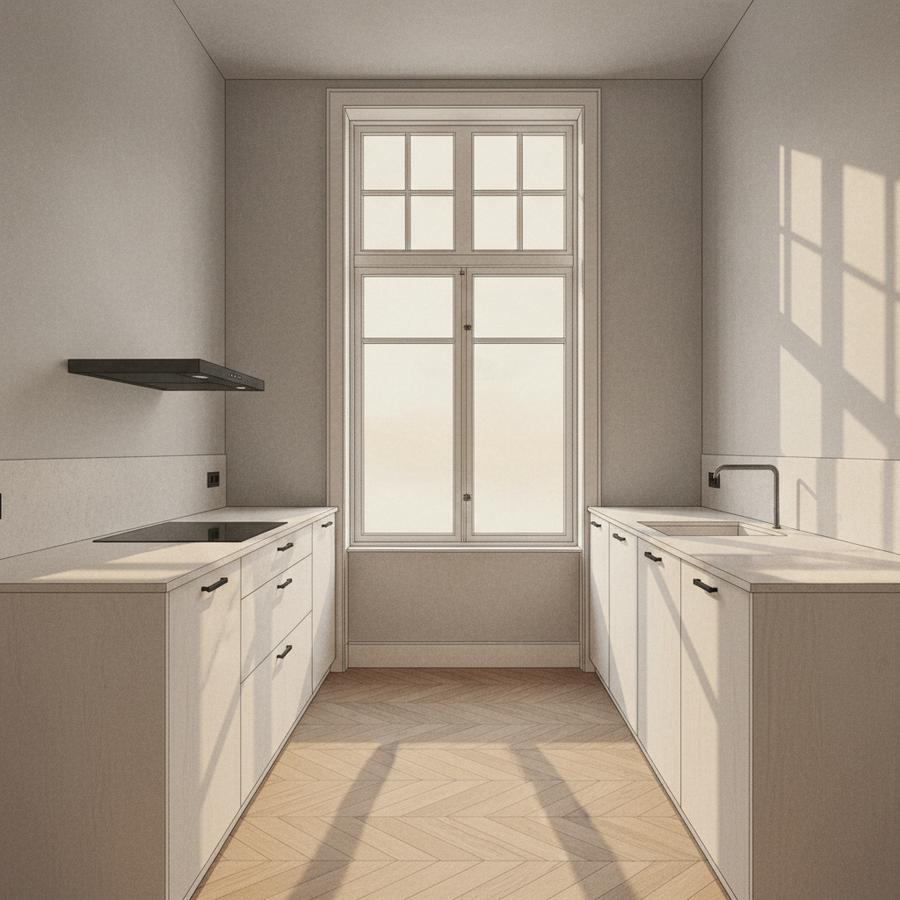
The 10 most common layout mistakes in small kitchens
1) Ignoring circulation widths. In narrow apartments, 900 mm between runs is rarely possible. Aim for 850 mm minimum clear aisle; if that’s tight, keep one run at 520–550 mm deep and the opposite at 600 mm so two people can pass without hip-checks.
2) Placing the dishwasher where it blocks everything. A DW at the start of a galley can freeze the whole space when the door is down. Place it next to the sink, but towards the window or the least-trafficked end. Consider a 450 mm slimline model if your run is under 2.1 m.
3) Oversized islands in narrow rooms. If the clear space around an island drops below 800 mm, it’s a tripping hazard. In small Amsterdam flats, a peninsula with 300 mm overhang for two stools often beats an island; it doubles as a prep landing for the fridge.
4) No uninterrupted prep zone. The most efficient kitchen has 600–900 mm of counter between sink and hob. Sacrifice a wall unit before you sacrifice this rectangle; it’s where 80% of cooking happens.
5) Tall units stealing light. Full-height blocks near windows make compact kitchens feel tunnel-like. Keep the first 600–900 mm next to a window low and use open rails or shallow shelves for everyday items.
6) Doors and drawers colliding. Model every swing. Ensure the oven, DW, and adjacent drawers can open simultaneously without conflict. Handleless or J-pull fronts reduce snagging in narrow corridors.
7) Underestimating ventilation and noise. In apartments with mechanische ventilatie, a recirculating hood with a quality plasma or carbon filter can beat a weak duct run. Choose hoods and dishwashers under 45 dB(A) to keep neighbours and VvE happy.
8) Forgetting the bin station. Dutch waste separation needs at least two compartments (restafval and PMD), ideally three. Reserve a 400–600 mm cabinet with pull-outs; retrofitting later steals precious prep space.
9) Overly deep cabinetry on the narrow side. In a 1.9–2.1 m wide kitchen, run one side at 600 mm and the opposite at 520–550 mm depth. Customizing to 550 mm can save the project: doors pass comfortably and the space reads broader.
10) Lighting as an afterthought. A beautiful counter is useless if your hands are in shadow. Plan layered lighting: under-cabinet task lighting (3000K), a dimmable ceiling wash, and a focused pendant or spot on the prep zone.
Practical tip 1: Specify a 550 mm deep worktop and cabinets on the “secondary” run. You’ll gain 50 mm of aisle without sacrificing usable storage; pair with 450 mm deep wall units to keep sight lines open.
Practical tip 2: Place the oven at 1200 mm centreline in a tall unit and keep the main run continuous at counter height. This creates a seamless prep surface and eliminates the “hot corner” next to the hob.
Practical tip 3: Next to the hob, allocate a 300 mm pull-out for oils and condiments. It removes countertop clutter and keeps the main drawer stacks optimised for pans and plates.
Amsterdam and Noord-Holland constraints you must plan around
Monumentenzorg and façades: In listed canal houses, you can’t vent a hood through the façade without permission, and you often can’t touch original beams. Design the layout around a recirculating solution with a high-grade filter and seal any duct penetrations with reversible methods. If a wall must be furred to hide services, use vapour-open materials (lime-based plasters) to respect the building’s breathability.
VvE approvals and shared stacks: Moving wet points, chiselling shafts, or adding penetrations typically needs VvE approval. Submit a compact drawing set showing fixture locations, noise specs, and working hours. Amsterdam’s bouw- and environmental rules also limit noisy works; plan demolition and core drilling inside permitted time windows to avoid fines and neighbour disputes.
Logistics in narrow stairwells: Many staircases won’t accept 2.4 m panels or stone slabs. We routinely split tall units into carcass modules under 2.1 m with on-site coupling, and choose 12–20 mm engineered stone or porcelain slabs delivered via façade hoist. If a ladder lift or street crane is needed, coordinate a short-term permit and reserve parking bays early.
Energy and subsidies: While kitchens don’t directly qualify for ISDE, a move to induction and improved ventilation can be bundled with broader sustainability works (insulation, heat pump, or boiler upgrades). It won’t singlehandedly jump your energy label, but it reduces gas dependency and heat gains. Confirm electrical loads with your installer; a 7.4 kW hob may need a dedicated group and possibly 3‑phase service.
Lighting, acoustics, and ventilation that don’t fight the layout
Keep task lighting continuous along the prep run with a low-glare LED profile. Use warm 2700–3000K to harmonise with oak and natural stone. For acoustics, specify soft-close hardware, felt pads behind door fronts, and a dense plinth board; they cut high-frequency clatter in reflective, hard-surfaced rooms.
For ventilation, integrate the hood into a shallow upper or a ceiling cassette away from the sight line. If using a recirculating system, oversize the filter capacity rather than the fan speed. In mechanically ventilated apartments, ensure make-up air through window trickle vents to avoid stale zones.
Checklist: your 6-step path to a flawless compact kitchen
- Measure the shell precisely (lengths, widths, diagonals) and note window heights, joist direction, and existing services.
- Choose the right geometry: galley for 1.8–2.2 m widths; L-shaped if openings prevent a second run; peninsula only with 800 mm clear all around.
- Lock the wet zone first (sink, DW) on the service wall; reserve 600–900 mm uninterrupted prep between sink and hob.
- Select compact, quiet appliances (45–60 cm) and model every door swing and interference at 1:1 on plan.
- Confirm electrics (dedicated groups, 2/3‑phase), ventilation strategy, and any VvE/Monumentenzorg approvals before ordering.
- Plan delivery logistics: module heights under 2.1 m, façade hoist if needed, and protected routes through common areas.
Premium touches that earn their keep
Materials matter in small spaces. A 12 mm porcelain or sintered stone worktop reads visually light yet resists stains; limewashed walls soften light and hide minor scuffs; oak veneer with a matte finish brings warmth without visual heaviness. Keep hardware integrated and minimal, and use a continuous shadow line to make the base run float—small tricks that make a narrow kitchen feel composed.
Design for decades, not seasons. Prioritise clear circulation, an uninterrupted prep zone, quiet performance, and serviceable details. In Amsterdam’s compact homes, that’s the recipe for a kitchen that works beautifully every day.